Knots & Rigs
A collection of the most popular knots and rigs used in freshwater fishing today.
Double Loop Improved Clinch Knot
The line end is passed through the hook eye twice. The line is then wrapped several times around its standing part, then passed through the two loops near the “eye.” The final step is to put the line end through the large loop and trim the tag end. It’s a very strong connection, especially with light-test line.
Palomar Knot
Many anglers find the Palomar Knot the easiest of all knots to use for tying line to hooks, lures, and swivels. It’s a strong, simple knot that can be tied by “feel” – even in darkness. Because the line end must be doubled before making the Palomar, it can’t be used for fastening heavy line or leaders to hooks or swivels with small rings.
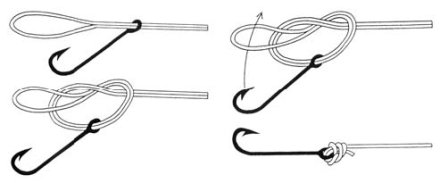 Fig. 1: Double the end of the line and the lop through the hook eye.
Fig. 2: Double the loop back, then make an Overhand Knot around the standing line, leaving a loop large enough for the hook (or lure) to pass back through.
Fig. 3: Put the hook (or lure) through the loop, as illustrated.
Fig. 4: Pulling on the standing line will draw the know tight. Trim it, and the knot will be compact and effective.
Non-slip Loop Knot
This loop knot is designed to allow maximum action to be imparted to plugs without restrictions from main lines. It works well with diving plugs, spoons and flies, and can be used anytime you need a strong loop as it retains 95 percent original line strength.
 Step 1: Make a simple over hand knot, leaving about 6 inches towards the tag end.
Step 2: Pass the tag end through the eye of the hook and then into the loop and out again. Note that the tag and standing end and also the loop pass through the over hand knot in the same over and under direction.
Step 3: Make 4 wraps with the tag end around the standing line. Then put the standing end through the over hand knot as illustrated.
Step 4: Lubricate, then pull the standing end and the fly to tighten. As the knot tightens snug up the tag end.
Single Sheet Bend Knot
This is a suitable knot for panfish, and is occasionally used by anglers with heavy monofilament or nylon-coated wire – especially at night – because the knot is easy to form with heavy line or multi-strand wire.
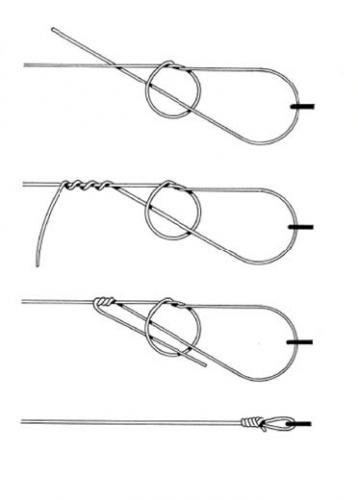
Surgeon’s Loop
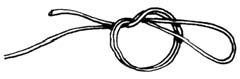 Fig. 1: Double the desired length of standing line, allowing at least 8 inches between the end of the loop and the tag end to work with.
This is one of the quickest and easiest loops to tie. It’s extremely strong and retains nearly 100 percent original line test. While it needs more line to tie than most knots, it ties well with virtually any pound test line.
Fig. 2: Make a second wrap into the overhand knot loop and, while grasping tag end and standing line, slowly pull the loop until the overhand knot closes. Trim tag end.
Carolina Rig
This rig has become one of the most popular ways to fish soft plastic lures for bass. It can also be used with floating-diving plugs and natural baits. The Carolina Rig allows anglers to cover water faster than if using a standard bottom-bumping lure. It’s excellent for deep-water fishing, and can be trolled or drifted. It can be modified to incorporate fish-appealing sound to the lure. By using a heavy brass slip weight, glass bead and brass barrel swivel, each time the brass parts hit the glass bead a sharp “clack” is made, which draws the attention of fish. This is a real plus in muddy water. For clear water, using a small plastic worm with exposed hooks makes the Caroline Rig very effective. Leader length determines how “high” the lure floats above bottom. In places with tall weeds or brush, use a long leader. Where weeds and moss are minimal, try a shorter leader.
Bumper Knot (Salmon Egg Loop)
The bumper knot is a “must know” knot for fishing salmon and steelhead. Drifting roe and other types of soft, delicate baits is nearly impossible without a loop on the hook to hold them in place. The bumper knot is also the strongest leader-to-hook connection; it retains 100 percent line strength.
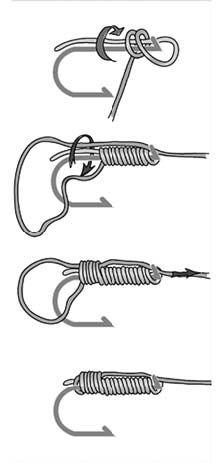 Step 1: Start with 24 to 30 inches of leader material. Pass the end of the standing line through the top of the hook eye and lay the tag end alongside the hook shank. The tag end should not be longer than the hook bend or it will interfere with making wraps.
Step 2: Beginning at the eye, take the standing part of the leader and make 7 to 8 tight wraps down the shank.
Step 3: While holding the wraps against the shank (to prevent unraveling), pass the other end of the leader back through the bottom of the eye. Leave a loop large enough to pass around the hook.
Step 4: Begin wrapping the loop around itself and the hook shank, making another 6 to 7 tight wraps. (You’ll be wrapping the loop line around the line previously passed through the hook eye.)
Step 5: While holding the wraps against the shank, and still holding the loop open and tight with another finger, slowly pull on the standing part of the leader until the remaining loop cinches tightly against the other wraps. (Be sure to moisten the loop before pulling it tight.)
Step 6: Trim tag ends closely to wraps.
Fishing Brochure
Live Interactive Map
Hot Spot Map
